
I got my hands on a TalkTalk HUAWEI HG523a. This is one of the routers distributed to TalkTalk subscribers. This is my first attempt of doing any kind of embedded device analysis so i decided it would be beneficial to document the steps i take. As i progress i will write new posts detailing what i have done.
Before i start, one of the best resources i have found in working through this project is devttys0.com. A lot of the things i do in this post i found in that blog.
OK, so the first thing i decided to do was to open the router and try to find some kind of serial interface that would allow me to get a shell on the device.
 Looking at the board you can see a a grouping of five pins that look quite like a serial port. You would expect to find a transmit, receive, power and ground pins to connect to. The next step to to identify which pin is which. I did this using a multimeter.
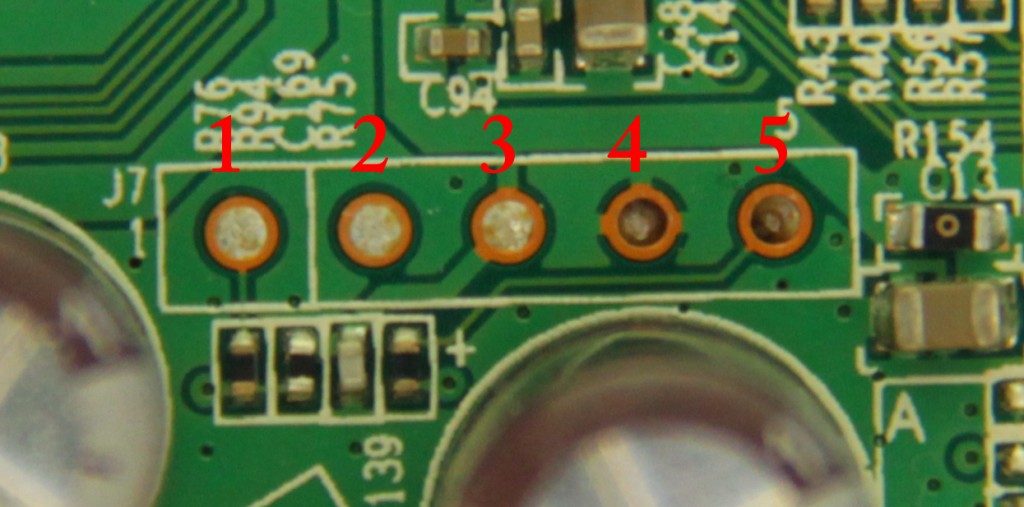 The first pin to identify is ground. To do this i switched the multimeter to continuity mode. This checks if there is an electrical connection between the two probes. I attached one of the multimeter probes to the power socket casing (which is a known ground point) and the other on each of the pins in turn. You would expect the multimeter to show there’s continuity if it is connected to two ground pins. In this case it showed continuity on pin 4. So this is the ground pin.
The next step is to identify the transmit pin. You would expect when the router is powered it it will display boot messages and other information on the serial interface. This kind of behavior can be seen on the multimeter as an erratic voltage. So to find the transmit pin simply connect one probe to ground as always, and the other to each pin in turn. The pin that exhibits an unstable voltage that constantly changes is likely the transmit pin. In this case the transmit pin is pin 5.
With this router i couldn’t clearly identify the power and receive pins. Both pin 1 and pin 3 has a 3.3 volt power and pin 2 was completely dead. So all i did was take a guess. I found that pin 1 is the receive pin and pin 3 is the power pin.
The next step is to connect to this serial interface. I used a USB-UART adapter i bought off ebay for £1.19 So i connect the USB-UART adapter to the pins on the router and power it up. I connect to the COM port using putty and was greeted with the following :
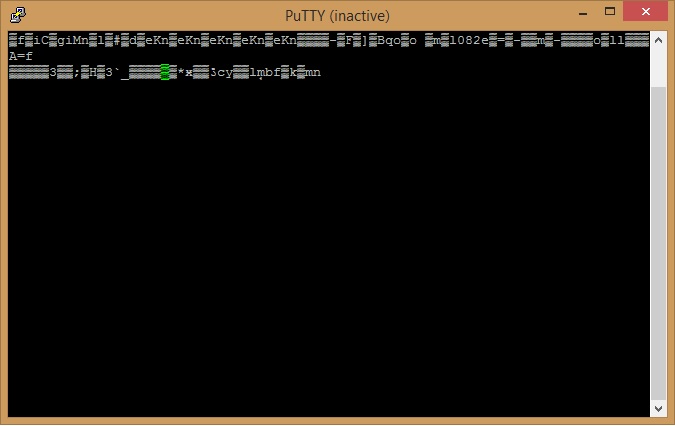 From my limited understanding i believed this to be because the BAUD rate was incorrect. So i found a very cool python script called baudrate which allows you to easily find the correct baud rate for the interface your trying to connect to. You just enter the command and use the arrow keys to cycle through the baud rates until you find the correct one. (The correct one will display the boot-up text correctly.)
1
2
3
4
5
6
7
8
9
10
11
12
13
14
15
16
17
18
19
20
21
22
23
24
25
root@kali:~/Documents/baudrate-1.0/src# python baudrate.py /dev/ttyUSB0

Starting baudrate detection on /dev/ttyUSB0, turn on your serial device now.
Press Ctl+C to quit.
@@@@@@@@@@@@@@@@@@@@@ Baudrate: 115200 @@@@@@@@@@@@@@@@@@@@@

*******____________skb_________size 224
/proc/FastPath created
Realtek MCast FastPath
/proc/mc_FastPath created
NET: Registered protocol family 1
NET: Registered protocol family 17
Bridge LAN vlan registered
Ebtables v2.0 registered
802.1Q VLAN Support v1.8 Ben Greear <greearb@candelatech.com>
All bugs added by David S. Miller <davem@redhat.com>
VFS: Mounted root (squashfs filesystem) readonly.
Freeing unused kernel memory: 108k freed
init started: BusyBox vv1.9.1 (2012-03-05 00:16:52 CST)
starting pid 69, tty '': '/etc/init.d/rcS'
rcs
RCS DONE
starting pid 72, tty '': '/bin/sh'

BusyBox vv1.9.1 (2012-03-05 00:16:52 CST) built-in shell (ash)
From this output you can see that at a baud rate of 115200 the text displays normally. So the serial interface uses a 115200 baud rate. As it turns out this is quite common.
Once the boot up has finished i hit enter on the keyboard and it displayed a login prompt. I entered the default user name and password of admin and admin which was printed on a sticker on the router. This then logged me into the routes serial interface.
1
2
3
4
5
6
7
8
9
10
11
12
13
14
15
16
17
18
19
20
21
22
Append upnp ssdp listener ok.
Enable Got value: 1
NAIEnabled Got value: 1
skaystemQuery is null
skaystemQuery is null
signin_h2c_omd ok.
D3 hot -> L1
Entering LoW
------------------------------
-Welcome to AIP Cli-
------------------------------

Login: admin
Password:
AIP>?
cls
debug
help
save
?
exit
AIP
As you can see from the screenshot you are entered into a ATP command line interface. Looking through the options of this interface it seems quite limited as to what you can do. Some things of interest include:
By typing ‘debug display cwmp’ it allows you to view details for the TR-069 application layer protocol used for the remote updating of router firmware.
1
2
3
4
5
6
7
8
9
ATP>debug display cwmp
ACS URL: http://acs.talktalk.co.uk:7547/ACS-server/ACS
User Name:
Password:
Connection Request User Name: userid
Connection Request Password: cRP#21530316207S2C088299
Connection Request URL:
Inform Enable: 1
Inform Period: 86400
You also have the option for setting the authentication type used for cwmp.
1
2
<pre class="wp-block-preformatted">ATP>debug set cwmp authtype ?
0: none; 1: basic; 2: digest; 3: adapt
And to set the password for TR-064 with:
1
2
ATP>debug set tr064 pwd mypassword123
ATP>
Going through all the other options i couldn’t find many other useful commands. I decided to do a bit of googling to see if there was any hidden commands that could be used. I found a blog post where someone said to enter the shell command to bring up a Busybox shell. I gave this a try and it worked.
1
2
3
4
5
BusyBox vv1.9.1 (2012-03-05 00:16:52 CST) built-in shell (ash)
Enter 'help' for a list of built-in commands.
# ls
var   usr   tmp   sbin  proc  mnt   lib   init  etc   dev   bin
#
As it turns out. Looking at the same blog post its possible to get the same level of access by just telnetting into the router and entering the admin admin login details i used. But i suppose what i have done is good practice.